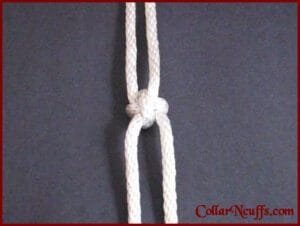
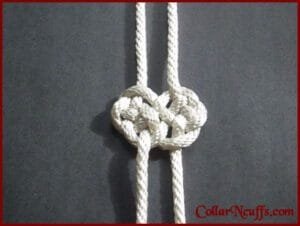
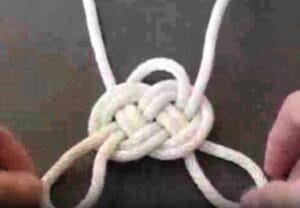
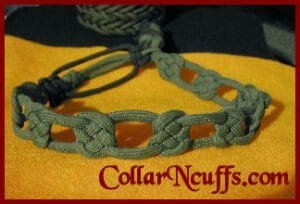
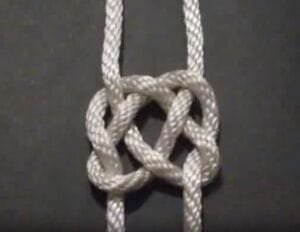
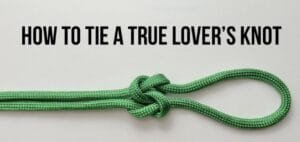
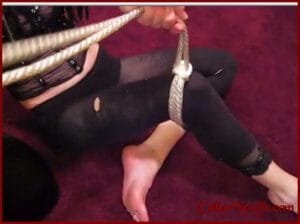
Cross Knot 

Mastering the Cross Knot for Bondage: A Secure and Stylish Alternative

Introduction to the Cross Knot

The cross knot is a versatile and secure option for those involved in the art of bondage. Known for its nonslip properties, it serves as a reliable alternative to the traditional square knot. It is especially popular for tying harnesses and crafting intricate designs such as the tortoise shell bodysuit.

Step-by-Step Guide to Tying a Cross Knot

1. **Start with Two Ropes**: Begin by holding two ropes, each in one hand, crossing them diagonally over each other.
2. **Create an Over-Under Loop**: Take the rope in the left hand and loop it over and then under the rope in the right hand.
3. **Make the Second Loop**: Now, take the rope in your right hand and loop it under and then over the rope in the left hand.
4. **Tighten Securely**: Pull both ropes simultaneously to tighten the knot, ensuring it’s firm and doesn’t slip.

Why Choose the Cross Knot?

The cross knot offers several advantages in bondage scenarios. Firstly, its nonslip nature helps maintain tension, preventing accidental loosening. Secondly, the cross knot can be adjusted easily, making it ideal for creating various bondage patterns like harnesses and the tortoise shell bodysuit. Lastly, its aesthetic appeal adds a touch of elegance to your designs.

Applications in Bondage Design

This knot is favored in constructing intricate designs such as the tortoise shell bodysuit, where stability and durability are paramount. Its secure grip ensures that intricate patterns hold their shape, providing both functionality and aesthetic appeal. Additionally, the cross knot can be seamlessly integrated into harnesses, offering comfort and reliability during use.

Lopped Knots

Mastering the Lopped Knot for Bondage Ties: A Step-by-Step Guide

Understanding the Lopped Knot

The lopped knot is a versatile and essential knot in the world of bondage. Its primary function is to create secure and adjustable loops, making it ideal for both beginners and experienced practitioners. This guide will walk you through the process of mastering the lopped knot for bondage ties, enhancing your skills and ensuring safety.

Materials You Will Need

Before you start, gather the necessary materials to ensure a smooth tying experience. You will need:

  • Bondage rope (preferably made of natural fibers like cotton or hemp)
  • Safety scissors (to quickly release the knot if needed)
  • A willing partner who understands the basics of bondage safety

Step-by-Step Instructions

Follow these simple steps to tie a lopped knot effectively:

1. Measure and Cut the Rope: Start by measuring and cutting a sufficient length of rope. For most bondage ties, a length of 10-15 feet is adequate.

2. Create the Loop: Take one end of the rope and fold it back on itself to create a small loop. Hold the loop between your thumb and index finger.

3. Wrap the Rope: Wrap the standing part of the rope around the loop you’ve created and thread the end of the rope through the loop. Pull it tight to secure the knot.

4. Adjust and Secure: Ensure the knot is tight but not overly constricting. It should be secure enough to hold during movement but loose enough to avoid any discomfort or restriction of blood flow.

Safety Tips

When practicing bondage, safety should always be a priority. Here are a few tips to keep in mind:

  • Always have a clear and open line of communication with your partner.
  • Ensure that the rope is not too tight and does not obstruct blood flow.
  • Keep safety scissors nearby for quick release if necessary.
  • Avoid tying knots directly over sensitive areas or joints.

By following these steps and tips, you can confidently master the lopped knot for bondage ties, ensuring both safety and satisfaction for you and your partner.

Coin V’sCarrick 

The art of bondage often requires the use of intricate knots to ensure safety, security, and aesthetic appeal. Among the countless knots available, the Double Coin Knot and Carrick Bend are both highly regarded for their effectiveness in binding two strands of rope together. Let’s explore these knots, their differences, and their suitability for different scenarios.

Double Coin Knot: Aesthetic and Secure

The Double Coin Knot, also known as the Cloverleaf Knot, is widely praised for its aesthetic appeal. Its symmetrical design not only looks pleasing but also provides a secure means of attaching two strands of bondage rope. This knot is particularly advantageous in situations where both form and function are essential. Its design makes it less likely to slip or loosen under tension, ensuring a reliable binding throughout the session.

Carrick Bend: Strength and Stability

The Carrick Bend is another popular choice for combining two strands of rope. This knot is known for its strength and ability to handle heavy loads, making it ideal for scenarios requiring extra stability. The Carrick Bend’s structure distributes stress evenly along the ropes, reducing wear and tear and enhancing the durability of the knot. While it may not be as visually intricate as the Double Coin Knot, its robust nature makes it a dependable option for secure bindings.

Choosing the Right Knot

Deciding between the Double Coin Knot and the Carrick Bend ultimately depends on your priorities and the specific requirements of your bondage practice. If you value visual appeal and a secure hold that resists slipping, the Double Coin Knot is an excellent choice. On the other hand, if strength and stability are paramount, the Carrick Bend may better suit your needs. Both knots offer distinct advantages, and understanding their differences can help you make an informed decision when incorporating them into your bondage routine.

Arm Shackle

The Rope Shackle is a terrific way to tie an arm or a leg to a fixture, a piece of furniture or even another part of the body. It’s also useful for adding support to a suspension. The multiple loops of the shackle spread force equally, making it more secure and comfortable. The elegance of the piece is that it doesn’t tighten up under weight or when struggled against. The shackle can be tied directly onto a person. Here we show you how to tie it ahead of time, in your hand, so you can more skillfully slip it over the body part you want to secure.

New Report

Close