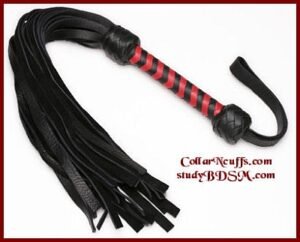
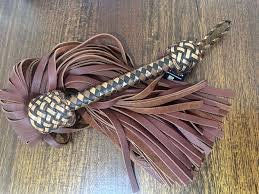
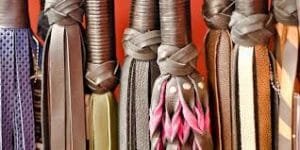
Kinky Crafts

Making your own Femdom/ BDSM toys

Here are a few items you can make easily and inexpensively for yourself. Maybe you want to be able to construct some toys instead of carrying things with you when you travel, or maybe you like the idea of using things you’ve made on someone. Either way, here are seven quick ideas for toys you can make yourself from easy obtainable materials. Each of the materials lists tells you what you need to make one of them, but you can make as many as you want the same way.


Bubblewrap Dildo

Materials List:

  • non-lubricated condom(s)
  • some bubblewrap, approximately 8 x10 sheets
  • some duct tape (only need a little)

Construction Details:

First, take the bubblewrap and roll it up (bubble side out for more sensations). Now take the condom and unroll it over the bubblewrap tube you made. Finally, use a little duct tape to seal the condom and you have an instant dildo. Or, if you want to use two condoms, you can skip sealing the first one and just slip the second one over the open end of the first condom now and then roll it down before sealing it with a little duct tape.

Play Tip:

Tell your partner to try to pop as many bubbles as they can (without using their hands of course).


Simple spreader bar

materials List:

  • wooden dowel rod, approximately 1 x24
  • three screw eyes, #6 size

Construction Details:

If you happen to have a drill you can make this easier by pre-drilling a hole in each end of the dowel rod and one hole in the middle. But if you don’t have a drill it’s easy enough to just attach the screw eyes by hand. One goes in each end of the dowel rod, and one goes in the middle of the rod.

Play Tips:

Ankle or wrist cuffs or other restraints can be attached to the eyes in the ends of the dowel rod. The middle eye and some rope or chain can be used to secure the rod to the head- or footboard of a bed, to a wall, or to the ceiling if you have an attachment point there. [Note: do not use for suspension, a metal spreader bar is suggested for any real weight-bearing play.]


Golfball Gag

Materials List:

  • practice golfball, plastic, with holes
  • piece of leather thong, approximately 24
  • emery board

Construction Details:

First, take the emery board and work on the rough edges where the two halves of the golf ball were joined. (Remember it’s going in someone’s mouth and you don’t want to cut their lips.) Then pass the leather lace through two holes on opposing sides of the ball. Knot the lace on each side of the ball to keep it centered on the lace.

Play Tips:

The ball goes in the mouth, the lace ties behind the head. The holes in the ball allow for breathing, drooling, and some grunting and screaming sounds to escape. Since your partner won’t as easily be able to use a safeword (if you use them), you’ll need to set up a safe signal instead.


Bootlace Whip

Materials List

  • handful of bootlaces, or the plastic lacing used for lanyards
  • roll of duct tape

Construction Details

Take the bootlaces and fold them in half. If you’re using the plastic lacing, cut them into lengths about 3 feet long and then fold those in half. Wrap duct tape around the folded section to make a handle for the whip.

Play Tips

With a variety of plastic lacing colors and some colored duct tape you can make a pretty attractive whip. But remember that this is not a gentle whip, and can be used to cause sharp though not severe pain (depending on where it’s used). You can also try wetting the laces before use to add more weight to the tails.


Frayed Rope Flogger

Materials List:

  • three feet of soft nylon rope
  • popsicle stick
  • piece of leather thong, approximately 24
  • Super Glue

Construction Details:

Take the rope and fold it in half with the popsicle stick lengthwise in the middle. Now put some Super Glue on the end of the leather thong. What you want to do is wrap the leather thong around the folded rope and popsicle stick to make a handle for the flogger. Start by wrapping over the end with the Super Glue on it, then finish by adding some glue to the other end and tucking it under the wraps. When you’re done just unravel the rope to create the flogger tails.

Play Tips:

While this isn’t a very painful flogger, it’s good for warming up someone before a heavier flogging or for bringing someone back down after one. The tails can tangle pretty easily, so tie a knot in them when not in use to keep them under control (hitting them with a little spray Static Guard will help with that too).


Clothespin Zipper

Materials List:

  • six to eight clothespins (or more)
  • silk cord, or plastic or leather lace, 24 (or more)

Construction Details:

This zipper can be made a couple of ways. The traditional way is to pass the cord or lace through the metal spring in each clothespin and knot the cord on each side of each clothespin. This gives you a reusable zipper that stays together for next time. The other way to make a zipper is to simply clamp each clothespin over the cord. While there is nothing keeping the clothespins on the cord, they will still all pull off at once.

Play Tips:

Make these with sets of different sized clothespins. You can string a lot of the little tiny ones on a cord to torment places where the big clothespins don’t work as well. Tie several strings to one control cord and pull that one to remove all the sets at once. Clips and clamps


Black Jack Cane

Materials List:

  • some clear vinyl tubing, 1/4 or 1/2 inside diameter, 24 long
  • two to four erasers from the ends of pencils
  • big handful of BBs (copper, steel or both)
  • Super Glue
  • roll of duct tape

Construction Details:

First put some Super Glue inside one end of the vinyl tubing. Now stuff one or two erasers inside the tube to seal that end. Trim the eraser even with the end of the tube. Turn the tube around and pour the BBs into the other end, almost filling the tube. (Twirl a piece of paper into a funnel shape to make pouring them in easier.) Put a little Super Glue inside this end of the tube too. And now stuff an eraser or two into this end, trimming it even with the tube end again. Wrap as much duct tape as you want around one end of the tube to make a handle for the cane.

Play Tips:

Depending on the diameter of the tube you’ll have either a stingier or a thuddier cane. If you use both steel and copper BBs you can add them in layers for a nice visual effect in the clear tubing. Add colored duct tape for a more custom touch. You can also fold the tube in half and duct tape the whole length of it to create a nice thuddy blackjack.

Resource Article : MissBonnie collarNcuffs.com © 2006

Floggers

Distribution policy:

(This article is reprinted from the library of the Society for Human Sexuality at the University of Washington. While there have been some changes in the formatting to make the document more appealing to the eye, there have been no changes in the text.)

Comments, ideas and constructive criticism always welcomed. As with all of my postings, any archivist is welcome to copy and distribute this story appropriately without let or hindrance, provided that the distribution is free of charge and the entire posting remains intact and unedited.

Disclaimer of a legal sort

Striking the human body must be considered dangerous. As I am neither a medical nor a legal professional, the following is offered as my opinion only, not a recommendation for any activity. Nothing can possibly replace personal experience and learning directly from those who have been there before. There are now workshops and demonstrations available in larger cities, avail yourself of one. I have no control over the use of this information, use it at your own risk. And as ever, proceed with caring.

WITH WHAT?-

A ‘flogger’ shall remain for the moment ‘any flexible many-tailed striking tool where the tails are simple strips of leather or similar substances, designed for use on the human body’. In short, not bullwhips, braided cat-o-nines, crops, scourges, thudtoys and such, simply floggers. A braided cat is similar to a flogger in many respects, yet has a distinct ‘feel’, both these and floggers with knotted ends are left for another discussion.

As floggers were less available in former days, many people made their own in various styles and weights. Even if you are not doing so, some basic principles of design might help you select a superior one from the regrettably large supply of the other sort. I shall not include specific designs, the subject has been done to death before, and they are readily available elsewhere. As Janet Heartwood has provided excellent information in her ‘Heartwood Catalog’, I have used a similar format in my materials listing below. Although I have not ordered from her and can give no opinion, her wares seem well received among posters here.

A group of floggers
hanging floggers

Design notes-

For any given force, the smaller the contact area that force is concentrated in, the greater the potential for damage. Think of a knife edge as the extreme case. This is why quality flogger tails have rounded edges and tips; although sharp edges require less work and are less expensive, rounded edges are preferable.

The wider the tail, the more surface area to be forced through the air, and again, the more lands at once on the skin. As a general rule for the same material, thin tails ‘sting’, wide tails ‘thud’. Thin, rounded thong tails sting much more than 5/8 inch wide flat tails, for example.

If all things are equal, the more tails a flogger has, the slower it travels, and the longer the tails are, the more leverage is gained. Both of the above make a flogger heavier, but the longer tails can make it disproportionately more difficult to control, therefore many of the ‘standard’ floggers have tail lengths between 15 and 22 inches. It is possible to do quite interesting things with a long flogger, such as laying it down an entire back at once, but this is not recommended for beginners as it can take serious practise to do well. Very short floggers have special uses for close work, one nipple at a time, that sort of thing. Floggers with perhaps 15 to 25 tails are average, twice that makes a heavier version of the same design.

For safety, flogger tails must remain fixed to the end of the handle; this region is where the most stress occurs in use. A good covering knot will help reduce this strain, and keep the tails together. The handle must work with your hand, not against it, neither too large nor small for a proper grip, and a knot or swelling near the end of the flogger serves to prevent slippage. Short handles are better for control, longer handles provide more leverage. The weight of the handle must feel ‘right’ with the tails [something one must feel, not read about. If the sellers will not allow a cautious swing of prospective purchases, find another shop].

Beyond weight, width and length, the materials matter most. I have personal experience only with the following, perhaps others may share their knowledge as well. A selection from the below provides a range of severity and feelings from ‘did you start yet?’ to ‘Omi god!’. Again in general, the softer and lighter the material, the safer it is [the harder/longer it may be used without risk], and the softer it feels. As ever,

~the RESPONSIBLE TOP TESTS each implement on herself before it touches a bottom, and checks for breakage or other safety problems before each use.~

Material List-

An ounce or two of loosely twisted cotton wool in a pillowcase folded lengthwise- this and the next two have been useful for those with no experience with flogging, yet much interest. Quite safe, I originally tested mine by repeated strikes to my own face with no effect.

Chamois-

a more permanent version of the above, a 3/8 inch tail width 20-tail is a specialized tool for flogging either a complete novice or one who prefers nearly no sensation. Noise, a very light skin-level sensation, and nothing else, tested as above. Of course it may also cause her to look back at you and ask if that is all you plan on doing….

Fabric-

silk and other softer fabrics can be made into floggers. Avoid fraying of edges by sewing the fabric into closed tubes, ironing each tube flat, then sewing the flat sides together along the long axis. Similar to chamois, more decorative colors available, and many fabrics are washable.

Deerskin-

soft and caressing, a tiny bit of sting, a bit of thud, and little else. Unless one is hitting exceptionally hard, a deerskin flogger can be used for a very long time without any notable skin reactions beyond a light flush. My personal favorite for light play or the less experienced.

Light Nylon Cordage [1/8 inch diameter for a start]

Take 15 loops 34 inches long [circumference], tying them together in a knot at one end. Cut the other end [tail length now perhaps 15 inches], fray the cut ends and attach to a handle. Two sensations, a very light one from brushing with the tips alone, and a heavier one from the non-frayed section. Simple to clean, quite inexpensive, and different weights of cord are readily available. Elkhide- heavier than Deerskin, yet soft and compressible, almost entirely thud. A lovely flogger for a slow building scene, very easy to relax into, and can be used with astonishing force with little risk of harm.

The next three are varieties of cowhide, the ‘standard’ leather. These are not specific cuts or tanning terms, but are classes of weight and type.

Suede-

in the lighter varieties, slightly harder than Elk, in the heaviest, just below the thick Topgrain below. Many floggers are made from various suede ‘splits’, these are inexpensive and simple to work. More thud and more sting than those above, may mark if swung sharply. Topgrain leather- smooth leathers create less friction than suedes, yet usually feel more ‘sting-y’ on the skin. Available in many weights, from light garment leathers to heavy saddle leathers, the more flexible varieties are recommended.

Oil tanned thick leather-

thick, heavy, and spongy leather, less flexible than thinner skins. Feels rather like an extremely heavy Elk as it compresses, yet a far more ‘serious’ thud.

Bison-

Interesting rough grain, heavy, rather inflexible, unless careful attention is taken the edges may cut the skin. Not a material for the beginner, but certainly something to use if desired.

Rubber-

flexible, yet quite ‘harsh’ feeling, stings rather like a thong flogger, leaves immediate marks. Different weight to air resistance ratio than any leather I am aware of. Exceptionally simple to clean.

Horsehair-

Extreme sting with no thud, entirely skin-level sensation of a very intense and itching sort. It is possible to break skin with horsehair, and it creates deceptively intense stinging at a very light touch. Cleanliness and body fluid precautions are required here, IMO. Additionally, most of these have tactile and scent qualities that may attract some, with the exception of the pillowcase, fabric, nylon, and the oil-tanned leather [much of which smells rather nasty]. All except the pillowcase may be made into floggers that look rather nice, and all of the above are now available ready-made through shops and catalogs.

Technique-

Much has been discussed, experienced, debated, and counter-debated here and elsewhere on this personal topic, but as this is intended as a generic suggestion for the beginner, perhaps there is a possibility we might avoid the usual flamewar-of-the-moment? Of course it would be wonderful if others would add their own ideas to this basic outline [subtle hint].

WHERE?

Where to flog? Where not?-

As ‘flogging’ is something that covers much by way of different activities, I have taken the liberty of separating it into ‘light’ [entirely sting, no deep tissue effects], and ‘heavy’ [sting and/or thud, reaching and jarring deep tissue]. *Hint* it is impossible to do ‘heavy’ flogging with a 20-tail chamois flogger, and quite difficult to do ‘light’ flogging with anything over deerskin in the materials progression cited above [with the exception of horsehair, again a sting-only material].

Of course all of these are merely physical ‘possibilities’ rated solely on my own opinions of [relative] safety, all limits and preferences of top and bottom must also be considered.

Where not to flog ‘under any circumstances’ [obvious safety reasons]-

The face, head, neck, the fingers and toes, over healing skin [if you want it to ever heal:-|].

Where to flog *extremely* lightly and carefully if at all [Really a gentle brushing motion rather than a striking one, tips of a *light* stinging instrument only, such as the chamois or horsehair above]-

The palms and back of the hands, over any joint, the lower front and back and sides between the top of the pelvis and the lower ribs [kidneys and other internal organs], the spine, the tops and bottoms of the feet.

N.B. Both feet and hands contain many tiny bones, once broken, these rarely heal well. Joints do not respond well to stress internal or external. Crippling is neither safe nor sane and unless one has an X-ray machine at call one cannot tell. Internal organs are more fragile than one might think, avoid thud entirely in their area. Many people have particular problems with body areas as well, do attempt the above *very* lightly indeed if at all!

Where to flog lightly-

Lower legs, arms, inner arms, breasts, genitals [skin is more fragile there], upper shoulders [accuracy], top of buttocks near spine, the muscular ridge on both sides of the spine [accuracy], the ribs where not protected by muscle.

N.B. There is some evidence that ‘thud’ on the female breast is not advisable for reasons of health, nipples are far better suited to strong stimulation. The top of the buttocks protect the coccyx, a small and fragile triangular bone at the base of the spine, avoid striking between the upper buttocks.

Where to flog ‘heavily’-

Buttocks, upper back on each side of the spine, thighs, lower shoulders. These areas are principally composed of strong bones protected by muscle tissue and a fatty layer, any other organs present are reasonably protected. There are reasons for these traditional areas being so traditional, they reduce the likelihood of major damage, making an extended safer session possible.

Position considerations-

Body position affects the position of both skin and muscles. If someone is bent over, the muscles of the rear lengthen and are not as thick, so the muscles themselves no longer protect in the same way. If the skin is stretched as well, it will feel more than it would if relaxed. Flogging someone who is standing unsupported may lead to falling, and seems foolish given the known physiological and psychological effects [‘going away’]. Standing bondage changes without warning to partial suspension if someone faints, plan for that possibility.

HOW?- Technique repertoire-

The more ways one knows to do an action, the more effects may be created, and the less one’s arm aches afterwards. Varying the motions has a good effect for top and bottom. Practice the following until you can do them from various directions and speeds, they all feel and work differently. Knowing the techniques is only one part, knowing which to use and when is beyond my ability to suggest in a post.

Swinging styles-

I know of four basic ways to end a stroke of any force:

  • [1] The tails land ‘flat’, with all of the force hitting at once [the tails either bounce off or drop almost vertically after this].
  • [2] The tails swing ‘through’, with the some part of the tips hitting and moving past the target area. From there, you may stop them [see ‘Accuracy-‘ below], or use some elliptical pattern to bring them round again, such as vertical or horizontal figure-8, circle, and the like.
  • [2a] The tail tips strike, go past, then immediately return via a swift spinning motion. If fast enough, this can seem continuous and the light, sharp touch has some sensational advantages.
  • [3] The tails are snapped or ‘whipped’ for a smaller point of stimulation that is more discrete and feels ‘sharper’.
  • [4] The tails land all at once on the body in a strongly forward motion resembling a punch or push more than a swing. Difficult to describe, and not as common, a hard thud stroke.

Each of these and all their variations may be primarily accomplished by wrist motion alone, or with arm and wrist moving together, this depends on your strength and the effect you seek. A properly balanced flogger requires less effort, and may be used for a longer time with less fatigue.

Skill-

I would like to add my voice to [I believe] Mauser’s previous post on this, bad technique is simply inexcusable; although we are all fallible, misplacing a stroke is not something to be taken lightly. There is indeed an art to the physical act of flogging. This may be learned as any other physical art, by observation, thought, and practice.

Practice in the air will teach you the balance of a flogger, but there is no substitute for actual impact. I believe it was STella who suggested a velvet pillow, and another person suggested suspending it in a way that allowed for movement. This works nicely, a safe and useful simulation.

If you rarely find velvet pillows strewn about, a towel wrapped round a pillow will serve the same purpose, you will see the path of the flogger tails quite nicely in the nap of the fabric. When you are able to land all the tails in one area on the pillow, practice moving that aiming point about until you know exactly where it will land each time. Now practice varying the speed, pace and strength of the blows without sacrificing that accuracy. When you have that in balance, try these variations on your own leg, get the feel of that specific instrument, *then* consider using it on the willing form of another.

Accuracy-

A flogger [as opposed to a crop or whip] ‘flops around more’, it naturally covers a wider area and is more difficult to control. If one avoids any spin on the handle, the first stroke may be accurate with the tails close together. Unfortunately the next ones tend to be less so unless some care is taken with the tails between strokes. The tails may be caught in the free hand between strokes, allowed to wrap gently on the top’s torso or leg to gather them together, or hang straight down between strokes. Any of these options will make the next stroke more accurate as the tails will at least start together. It is possible to stop them in mid-air as well, but more difficult to cause them to swing together. With practice, a well-made flogger that is 2 inches in diameter with the tails gathered together may be precisely placed within a 3 to 4 inch target path.

As a suggestion for beginners, start with the bottom reclining face down and the top kneeling or standing a-straddle, thus allowing gravity to assist in the guidance of the tails.

Swinging at a body part that protrudes ensures accuracy. The buttocks of a standing bottom whose entire front is pressed against a rigid support are a classic example of this, a straight side-to-side swing with the tips of a flogger can strike only the intended area, leaving the lower back and upper thighs untouched. Costuming may help as well, certain corsets may provide some protection for the kidneys, and may act as a sort of armor against mishap.

Wrapping-

If the middle section of tails strikes first on a rounded ‘edge’ of the body, and the tips ‘wrap’ following the curve, the tips actually accelerate far more than the original swing [physics, try it on something inanimate and see]. This is ‘wraparound’, and is usually a bad thing, causing inadvertent hard blows to areas one did not intend to touch at all, or ruining the controlled stroke one did intend. Keeping the flogger handle the same distance away from the skin as you did in practice will help here, as will being very careful to plan where the tips will fall at each stroke, avoiding curved edges to wrap around.

Being ‘tip conscious’ is the best way to avoid wraparound, but placing a pillow to protect the side of a reclining bottom works as a temporary solution for those who have this problem [works neatly with ‘whippy’ canes and crops as well].

IN SCENE-

How often?-

An average of one stroke every few seconds often proves best, with the exception of the spinning technique above, a fast version of which will seem constant. This ‘blow-rest-blow’ allows processing time to feel each sensation, and this rhythm once established may easily be changed for effect. No doubt some people will differ with me on this, but I maintain that it is a suitable pace to maintain in many cases. Increased speed near the end is also popular, and pacing oneself early on will allow for that.

Scene Structure-

Different people seek to give and receive different experiences. I offer two quite diverse scenarios to begin the discussion, perhaps others might volunteer their own favorite experiences or methods.

The slowly building endorphin encouragement-

Start slowly and lightly, begin by placing the flogger on the skin, holding the tail tips in one hand and the handle in the other, moving slowly to and fro on the skin. Then a slow caress with the tips for a bit, using more and more of the tails in a soft motion, building the movement into a partial swing, then a full swing. Vary placement gradually, work up and down the body in a methodical pattern with few surprises. When changing to a ‘harder’ flogger, repeat the above ‘accustomization’ process in miniature, the ideal being that although the actual force applied increases markedly, the ‘feeling’ remains much the same, matching the growing ability of the bottom to enjoy the increasing sensations. In a person looking for this, it is often possible to cause a ‘flying’ sensation of complete relaxation, buoyed by trust and natural reactions of the body to slowly increasing stimulation, with little or no feeling of actual ‘pain’.

The overwhelming sensation-

More of a ‘hard’ style than the above, to take a bottom past the ‘comfortable’ area into one more likely to push her strongly. Useful for ‘sensation overload’ and for those who seek a more ‘painful’ feeling. Beginning as above, vary the speed and intensity of the blows much more, pushing more, being less predictable. Work upper body and lower at seemingly random times, not allowing the bottom to grow used to the sensation before moving on. When changing instruments, do so with less subtlety, let her feel the change as an increase in intensity. Should he enjoy both sting and thud, use these interchangeably as well, surprise is often more effective than merely increasing the power of blows. Emotional and other considerations [IMO]-

A few suggestions in this admittedly most subjective area. A flogging of even the gentlest sort may have exceptionally strong effects on both participants; leaving time and energy to ‘wind down’ at the end of the session is, in my view, a requirement. Reassurance, a caress, or a simple touch during the flogging may do wonders also. Do not expect verbal responses if the flogging takes the bottom into new areas, he may not be possible to speak readily, and it may be that he will not be hearing well either. I find that flogging the front of the body, use of ear plugs and blindfolds, stringent bondage to open up delicate body areas, and making the bottom look at himself being flogged all are more ‘serious’ and have more emotional impact than a ‘simple’ flogging. Bruises may appear immediately, not appear at all, or suddenly appear after as much as a day or two, depending on the body concerned, and most people have some reaction to such marks, whether positive or not.

Philosophy-

Flogging can be a powerful and loving act, top and bottom not separated by the flogger, but connected through it. While basic competence and sensitivity will increase the chances of this, caring does help a bit too.

Article by MissBonnie © collarncuffs.com

Related Articles:
Different strokes – Different strokes, for different folks
A tale to tell – Flogger designs and materials
Whip Breaking – Whip care & breaking in a new whip.
Spanking – Spanking know how.
Whipping guide – A general guide to whip play.
Bull whip safety – A general guide.
Melanoma & SM play – know the dangers.
Canes – How to use a cane the right way
Florentine flogging – Florentine flogging is a two-handed style of flagellation.
Synchronized flogging – (Video tutorial) instruction to Synchronized flogging


Need more advice or videos? Many more ideas, hints, tips and discussions are located in Free Video and PDF download section within the Free Femdom Community

Florentine Flogging


Florentine flogging is a two-handed style of flagellation used in BDSM which involves the rhythmic use of a pair of matching floggers, one in each hand of the person administering the flogging. The term Florentine originally designates the art of wielding two weapons at once, one in each hand. For instance, it can refer to fighting with one sword in each hand, or a sword and a dagger. It is a style developed by the Italians in the city of Florence, hence the name.

Florentine floggers

The florentine flogging strikes can follow two different patterns:

  • “Four-Count” is the basic florentine pattern where the arm that stays above the other one remains the same.
  • “Six-Count” is a more elaborate pattern that alternates the arm that is above the other. It is also called full Florentine.

The ‘count’ denotes points in the pattern where a strike lands on the target. For the four-count, there will be four hits before the pattern starts again. Four-count florentine flogging

This is a step by step description of the four-count florentine flogging pattern. Both hands will travel roughly through a horizontal figure 8, or ‘infinity sign’, following each other.

Starting position

This position is only useful to place the arms in the proper place to get started. The hands will no longer be in that position during the pattern.

  • Both hands start on the same side of the body (for instance on the left side in that description), positioned as if holding a small box between them, at waist height.
  • From this position the right hand will lift up to just above the left shoulder height

Count 1

  • The right hand extends outward and swings diagonally, down and across the body towards the opposite (right) hip. It strikes the target with a backhand motion when it is about midway through the swing.
  • The left hand raises towards the left shoulder height. The right hand continues to travel past the right hip. The left hand in position to begin a forehand swing.

Count 2

  • The left hand extends and swings down towards opposite (right) hip in a forehand motion It hits the target about half way through the swing, as it follows the path of the right hand.
  • The right hand raises towards the right shoulder height. This will help clear the way for the left hand as it swings through. The left hand reaches the position near the right hip.

Count 3

  • The right hand extends as it swings down towards the opposite (left) hip, striking the target in a forehand motion. The left hand continues in its figure 8 path and the two arms are now crossed.This step when the arms cross can be tricky as they restrict each other’s motion. Twisting the body a bit to the right as the left hand moves helps keeping the arms free of each other. Lifting the right shoulder as it swings in this step is also helpful. Dropping the left shoulder a bit as the left hand raises to shoulder height will help to move through this position.
  • The right hand is moving up towards shoulder height, with a bent lifted elbow to make room for the left arm to swing.

Count 4

  • The left hand extends outward and down, diagonally towards the left hip, following the right hand path, striking the target in a backhand motion. The right hand is moving up to position to start its next swing, and clear the area for the left hand to swing through.

If the torso was twisted earlier to ease the crossing of the arms, the body now twists back comfortably to a neutral position. The pattern begins again. The next position is count 1 for the right hand to start its next swing.

Article MistressAsTemptingAsSin AKA IamDesire © Collarncuffs.com (page now returning 404)

Related Articles:

Floggers – How to use a flogger and get it right.
Different strokes – Different strokes, for different folks
A tale to tell – Flogger designs and materials
Whip Breaking – Whip care & breaking in a new whip.
Spanking – Spanking know how.
Whipping guide – A general guide to whip play.
Bull whip safety – A general guide.
Melanoma & SM play – know the dangers.
Canes – How to use a cane the right way
Synchronized flogging – (Video tutorial) instruction to Synchronized flogging

Different Strokes for different folks

So, you’ve gone out and gotten a flogger, you know which end is the handle, and you know where it’s okay to whack… you’re ready for a human target, right? Wrong!

At this point you’re missing one vital element: control. And the only way to get that is to practice.

Practice, Practice, Practice!

It would definitely be more fun to practice on a real live person… as long as things went right. But even though a flogger is one of the safer impact toys, it’s possible to hurt someone if things go wrong. Swing too low on the back shot, and you could hit the kidneys. Wrap on a hip shot and the tips of the tails will pound on sensitive nerves. And take it from me, those tresses sometimes have a mind of their own. First rule of Femdom…practice makes perfect

Probably the best practice target is a pillow. Pick a soft one; a foam pillow won’t “remember” where you hit, but a down or feather one will: you’ll be left with a “dent” that reveals exactly where your flogger landed. Better yet, if you can find one with a velour covering – or any significant nap – smooth it out evenly first, and your strokes will be very obvious.

Lay the pillow on a bed if you want to practice for a reclined submissive, or propped in a chair or on a sofa for standing. Move an easy arm’s length away. Pick a spot on the pillow where you’re going to land your first blow. Swing the flogger behind you and over. Bet you miss.

This is where the practice (part) comes in. You need to learn how far to stand from your target so you just “kiss” it with the tips, or land the full force of the tails as you choose. You have to discover how to guide the tails through a gentle arc so they won’t fly off where you don’t intend. And you’ll want to get the hang of swinging smoothly so the tails all group together instead of spreading out. It’s really not as difficult as it sounds. If it is, you’re trying too hard.

Let’s rewind a bit. If you’ve tried a couple of swings you know about where you want to be standing. For practice’s sake, try to have the tips just barely caress the pillow. Now, relax. Stand with your weight balanced between both feet, facing your target squarely. (Some folks prefer to “lead” with one shoulder or the other; I’m one of them. If this feels more comfortable to you, go for it.) It’s really impressive to “lean into” a flogging stroke with all your might and body weight. But there’s no need if you have the right tools. I find a certain perverted pleasure in being able to loaf my wrist over and elicit a yelp from a submissive with my “stinger” made of hard rubber. And you’re practicing now, remember? Let’s stick to good form and save the fancy stuff for later. Keep your shoulders squared, and don’t lean into the swing.

Different strokes, for different folks

multiple tailed flogger

The Basic Forehand Stroke

Now, hold the flogger with a loose, comfortable grip near the balance point, and let your arm hang naturally at your side; your palm will be turned towards your thigh. As you swing your arm back, your hand should turn; by the time your hand is behind you, your palm should be facing up. It will remain facing “forward” until the flogger makes contact.

The circle you describe should be smooth and even; don’t snap or jerk the flogger. You should be able to “pinwheel” your arm in a gentle circle and hit the pillow each time. Focus on the pillow – not the flogger – and “will” the flogger to always hit the same spot. It may be difficult at first, but keep trying and you’ll get the hang of it.

If you’re serious about flogging and practicing, your arm is going to get sore. Unless you’re a baseball pitcher, you’re probably using your muscles in a new way. Don’t overdo it; each day you’ll find your practice gets easier and your aim will get better.

Working On Your Backhand

Once you’ve gotten the hang of hitting one spot consistently with a forehand stroke, try a backhand. This will be easier if you turn your body a bit so the shoulder you’re not swinging with is closer to the target. Cross the arc across your body at about a 45 degree angle instead of straight-on. As you swing the flogger up in back, continue turning your palm instead of letting it face forward. By the time you reach your target, your palm should be facing up.

I’ve not seen many people do a backhand for a backhand’s sake. But practice this stroke until you can reliably hit the same spot with the same intensity, and then you can graduate to…

The Figure Eight

This is a combination of a forehand and backhand on each pass. You’ll find it works your muscles more evenly and is a bit easier for longer flogging sessions… plus it has a certain flair.

Start with a normal forehand as you’ve already practiced. As you come down towards your target, however, don’t go straight down; instead, cross in front of yourself. Rather than bringing your flogger down along your right side, bring it down to your left. Now swing up on the left and cross back; you’ll find your palm naturally turns for a backhand shot. Swing down and back to the right, then repeat the eight. This one will probably feel awkward at first. One key is not to travel back as far as you do for a forehand or backhand swing alone. Just let the flogger follow a gentle figure eight in front of you. With practice you’ll find you can hit the same spot with the same intensity on both the forehand and backhand strokes.

As you’re practicing the various strokes, keep an eye on the pillow and what’s happening to it. Are you seeing marks in the nap that extend from the center around the pillow, a clear sign of wrapped tails? Learn how to avoid wrapping with a pillow, before you ever lay your flogger’s tresses on a real person.

“figure eight” pattern that was simply beautiful. I am told that his style derived from Nito, a style of Kendo (Japanese sword fighting) which uses twin swords

Spinning

Spinning or pinwheeling a flogger can provide a gentle breeze, a fast caressing touch, or a barrage of stings. The technique is simple: hold the flogger’s handle firmly, and whirl the tails around in a tight circle. At first you might find it easier to get the tails spinning, then move them into contact with your target.

You may find you have lots of problems with spinning; don’t blame yourself until you try a different flogger. Some just don’t seem to want to cooperate, tangling their tresses around the handle or twisting amongst each other. Thicker, softer tails seem to exhibit this problem the most.

Wrist Action

Most references and teachers will tell you to swing from the shoulder. But when I attended Sarah Lashes’ flogging workshop at BR10, she also demonstrated another technique. Instead of grasping the flogger at the balance point, she held onto the “button” – the knob at the rear of the handle – and proceeded to spin the flogger, mostly using her wrist. It was a nice fluid motion, and she seemed to have a lot of control and flexibility without waving her arm all over the place. I’ve been told that the wrist was never meant to be worked that hard, and I’ve noticed my wrist gets sore very quickly when I experiment with this technique. Perhaps Sarah has a special twist that eluded me, or maybe this really is bad for the wrist. But it certainly looked nice, and I still play with it from time to time… you might want to do the same.

Let the Flogging Begin!

In the next installment we’ll take a look at working with a human target… and how to make flogging an enjoyable experience for both of you. Until then, practice, practice, practice!

Resource Article: Missbitch & MissBonnie © collarncuffs.com

Related Articles:

Floggers – How to use a flogger and get it right.
A tale to tell – Flogger designs and materials
Whip Breaking – Whip care & breaking in a new whip.
Spanking – Spanking know how.
Whipping guide – A general guide to whip play.
Bull whip safety – A general guide.
Melanoma & SM play – know the dangers.
Canes – How to use a cane the right way
Florentine flogging – Florentine flogging is a two-handed style of flagellation.
Synchronized flogging – (Video tutorial) instruction to Synchronized flogging

A tail to tell

Beyond weight, width, length, and point cut, the tail’s material matters most. There are a wide variety of leathers and other materials available, and each provides a different sensation.

I’ve ranked them here in roughly increasing order of severity. (Note: This is only a general guideline, based on what you’ll generally find under these names.

The fact is, the weight of leather and how it is tanned has a tremendous bearing on the “feel” of the leather. Whenever possible, touch for yourself rather than relying on descriptions… mine or anyone else’s.)

floggers
  • Chamois: The same thing you use to dry your car, chamois is buttery soft and very light. It’s rare to find a flogger made out of this stuff, and with good reason: chamois will provide almost no sensation at all! You’ll get some noise, a very light skin-level sensation, and not much else.
  • Plonge: A thin, lightweight, buttery soft cow hide, plonge has a shiny finish and a lush suede side. It is extremely gentle, although it can produce significant sting if used with force. Very few whipmakers work in plonge.
  • Deerskin: A light and velvety hide, deerkskin is great for caressing the body, and makes an excellent “warm-up” whip. Lots of noise, but very little impact. I find it makes loud thwack each time, yet most I use it on the recipients never flinch.
  • Light Cowhide: Slightly stiffer and heavier than deerskin, light cowhide is used by some whipmakers as an “in between” material. It generally has a light thuddy feel.
  • Elk: Heavier than deerskin, Elk is still fairly soft and compressible. It delivers almost pure thud, but gently so: you can put a lot of force behind a blow without risk of hurting someone.
  • Full Suede: A bit harder and stiffer than Elk. Mostly thuddy, but can sting a bit if the tips are flicked quickly. I find most prefer a full suede and find it to be the most versatile
  • Top-Grain Cowhide: These leathers are smooth on one side, creating less friction with the air and more sting on impact. Whipmakers seem to generally steer clear of these, perhaps because of the “mismatched” look of the tails.
  • Moose: A dense and supple leather with a nice surface texture. Mostly thuddy, with some sting. Very few whipmakers work in moose.
  • Buffalo or Bison: A thick, dense, yet soft leather with a very distinctive and defined grain. Very thuddy, but can sting if used correctly. Not many whipmakers work in this material.
  • Bullhide: Heavier and less stretchy than buffalo, bullhide produces a lot of thud and some sting.
  • Latigo: A very dense and tough cowhide, heavily tanned. Rarely used in floggers, latigo produces intense sting with very little effort.

Leather or Not…

Leather isn’t the only material available . Some very interesting floggers have been made from nontraditional materials. Rope: Unwind or unweave a rope, add a handle, and you have an interesting and versatile flogger. Widely frayed ends result in a very gentle toy; knotted ends can be more severe. Only a few whipmakers work with rope. ( found I have to make my own to get a decently balanced piece)

  • Horsehair: Like a hair shirt, a horsehair flogger delivers the sensation of being scratched. This is one of the few floggers that grows less powerful as you make the fall thicker; more hair slows down the swing and reduces the impact. Horsehair flogger have some thud and very little sting, and doesn’t feel “scratchy” unless you strike with the very tips. Another, lighter horsehair flogger I tried had a lot of sting and felt quite scratchy.
  • Rubber: Most people will caution you that rubber whips are very severe. I call these types “stingers“ that usually

Chain: Fine metal chain, or the ball chain used to turn on ceiling fans, is sometimes used to make floggers. Very intense, these should be used with great caution. Since they’re made of metal and hold temperature well, they’re more popular for dragging over the skin after being stored in a freezer than for actual floggings. thuddy feel. Chain floggers are fairly rare.

Floggers Versus Cats

Depending on who you ask, all floggers are cats, all cats are floggers, or they’re two distinctly different beasts. I tend to think of floggers as having flat tails and cats as anything with braided or round tails. In particular, nine braided tails with knotted or weighted ends is most definitely a cat.Cats tend to be quite severe, and go past sting into more of a “cutting” sensation.

Resource Article : MissBitch & MissBonnie © collarncuffs.com

Related Articles:

Floggers – How to use a flogger and get it right.
Different strokes – Different strokes, for different folks
Whip Breaking – Whip care & breaking in a new whip.
Spanking – Spanking know how.
Whipping guide – A general guide to whip play.
Bull whip safety – A general guide.
Melanoma & SM play – know the dangers.
Canes – How to use a cane the right way
Florentine flogging – Florentine flogging is a two-handed style of flagellation.
Synchronized flogging – (Video tutorial) instruction to Synchronized flogging

New Report

Close