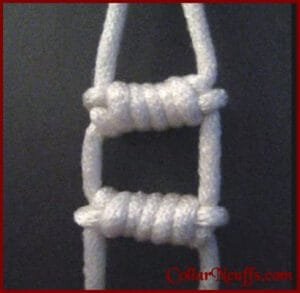
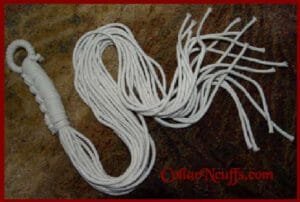
Rope Ladder

Enhancing Your Femdom Equipment with a Self-Crafted Rope Ladder

The Unique Benefits of a Rope Ladder in Femdom

Additions to your femdom equipment can significantly enhance the dynamic nature of your sessions. One such versatile tool is a self-crafted rope ladder. This simple yet effective item can contribute a variety of benefits, including enhanced accessibility, improved flexibility, and added creativity to your scenes.

Crafting Your Own Rope Ladder

Creating your own rope ladder is not only a cost-effective solution but also allows you to customize it to your specific needs. You will need sturdy rope, basic knotting skills, and some patience. As you work on your rope ladder, consider the spacing of the rungs and the length of the ladder to suit different scenarios within your femdom practice. Tailoring it yourself ensures that it is safe and suited precisely for your intended use.

Integrating the Rope Ladder into Sessions

Once your rope ladder is ready, the potential for its use is limited only by your creativity. You can hang it from various secure points to create new and exciting positions for your submissive. The physical exertion required to climb the ladder can also be an interesting test of endurance and obedience. Additionally, the visual appeal and mental challenge it presents can deepen the psychological aspect of your femdom sessions.

In conclusion, the addition of a self-crafted rope ladder to your femdom equipment arsenal is indeed a wonderful addition. It offers practicality and innovation, making your sessions more engaging and customizable. Whether you are a seasoned practicioner or new to femdom, a rope ladder is a valuable tool worth considering for your collection.

Spreader Bar

How to Use a Spreader Bar in Femdom Play

Introduction to Spreader Bars

Spreader bars are versatile tools commonly used in femdom play to enhance the experience for both parties. They are designed to keep certain body parts spread apart, which can heighten sensations and introduce an element of restraint into the scenario. If you’re new to using a spreader bar, this guide will provide a comprehensive introduction and safety tips.

Choosing the Right Spreader Bar

When selecting a spreader bar, consider the material, length, and adjustability. Spreader bars can be made from various materials such as metal, wood, or plastic. Metal bars tend to be more durable, while wooden and plastic bars can offer more flexibility. Adjustable spreader bars are highly recommended as they can be tailored to fit different scenarios and body types.

Setting Up the Scene

Before incorporating a spreader bar into your play, ensure that all participants are comfortable and aware of the boundaries. Consent and communication are paramount. When you’re ready to begin, securely attach the spreader bar to the submissive’s ankles or wrists, depending on the desired position. Some spreader bars come with cuffs already attached, while others might require separate cuffs or ropes.

Safety and Aftercare

Safety is crucial when using a spreader bar. Make sure to regularly check the cuffs or ropes for tightness to avoid cutting off circulation. It’s also important to have a quick-release method in case of any discomfort or emergency. After the session, engage in aftercare to ensure the submissive is comfortable and attended to, helping to transition smoothly back to everyday life.

Using a spreader bar can greatly enhance femdom play by introducing new dynamics and sensations. With proper communication, preparation, and safety measures, it can be a highly rewarding experience.

Shrew’s fiddle Femdom toy building plans

Tools Needed:

  • Jigsaw
  • Drill
  • Sandpaper
  • PVA wood glue
  • Paintbrush
  • Hacksaw
  • Staple Gun

Materials Required:

  • Small padlock
  • Eccentric latch
  • 1“x12” Planed Pine
  • 3/4“ screws
  • Small can Dark Oak Stain
  • 1 Pair of Barrel Hinges
  • 1” Steel backflap hinge
  • Strips of leather

Instructions:

Cut out two identical panels from the pine – see fig 1. for pattern. Finish the board with sandpaper. Be sure to remove any snags and splinters. Take extra time on the edges which the saw may leave jaggered.( Remember you will have a person in this shrew.)
Next, cut out the ‘chin rest’ and ‘machine head’ from the pine and sand smooth. You will need two identical ‘machine heads’ and two identical ‘chin rest’ pieces – see fig 2. for the ‘machine head’ pattern. Look at the picture to see how the ‘chin rest’ is shaped, and use your main body as a pattern for it.

Screw the ‘chin rest’s onto the main body of the fiddle (do this from below to hide the screw heads), this should bulk up the width on the bottom edge of the fiddle enough to easily accept the 1“ (25mm) Flapback Hinge.
Drill two holes into each ‘machine head’ (as shown in fig 2.) and screw two parts of the barrel hinges into the holes on each ‘machine head’. This will give the tuning key look. Now attach the two ‘machine heads’ into the cut outs on the main body. When you put the two halves together you should now have something that reasembles the end product. Varnish the two halves and allow to dry.

Cut some leather off cuts into squares and roll them up into cigar size tubes. Using the staple gun, line the wrist holes and neck hole with rolled up leather. This will make the wearing of the fiddle easier over prolonged periods.
Finally, fix the hinge to the back and attach the eccentric clasp to the front. I used a nice little brass padlock to secure it shut, this has the bonus of making a great clattering noise when the fiddle is moved on the wearer.

Resource Article : MissBonnie © CollarNcuffs.com

Saw Horse

Materials:

  • #2 pine or pressure-treated pine lumber
  • (2“ x 6”, 2“ x 4”, 1“ x 4”, 1“ x 2” scrap pieces, etc.)
  • 3/4“ plywood
  • Table saw
  • Battery-powered drill
  • Phillips screwdriver bit
  • Countersink
  • 2-1/2” decking screws
  • Finish nails
  • Clamps
  • Safety glasses and ear protection

When you custom-build a sawhorse, you can create one with the dimensions and features that best suit your needs. Don’t hesitate to experiment with the dimensions and materials.

Sawhorses may be made from almost any commonly available wood, from scrap lumber to expensive hardwood. The quality of wood should be based on the type of work it will be used for. Ordinary #2 pine is a good choice, but if you plan to use the sawhorses outdoors, choose rot-resistant pressure-treated pine, which is slightly more expensive.

Whenever working with power tools, wear protective eyeglasses and ear protection, and follow all the manufacturer’s safety recommendations. To build a sawhorse like ours, begin by cutting a 2“ by 6” to a length of 36“ for the sawhorse top. Bevel the top board to accommodate the sawhorse’s angled legs. Set your table saw at a 15-degree angle, and cut a slight bevel along the length of the board (figure M)

, then flip it over and do the same on the other side (figure N).

Cut four 32” legs from 2“ by 6” lumber. The legs should then be beveled to 15 degrees on each end–on top so that each leg will be flush with the top piece and on the bottom to give the sawhorse a firm footing (figure O).

Attach the legs to the beveled top with 2-1/2“ decking screws (figure P)

, which have good holding power and won’t rust if they get wet. Use clamps, or enlist the help of an assistant, to hold the legs in place while attaching them. Drill pilot holes so the screws will be less likely to split the wood. Drive the screws by hand or with a power drill and a Phillips-head screwdriver attachment. Attach the legs about 4” from the end of the top piece (figure Q).

Adding a tool shelf and braces makes the sawhorse both sturdier and more functional. A comfortable height for the shelf is around 14“ from the floor. Hold a 1” by 4“ board across the legs at a height of about 14”, and mark it with a pencil (figure R),

indicating how much to cut off and the angle for cutting. Following the pencil marks, cut off the excess wood. Once you’ve made the cut, check to be sure the fit is good (figure S),

then use the piece as a template for the next three braces.
Line up the first support with your pencil marks, and clamp it in place at both ends (figure T)

to hold it while you attach it. Drill pilot holes, then secure the support by driving 1-1/2“ screws. Repeat the process for the other braces. Once all four braces are in place, you can add the tool shelf. Cut a piece of plywood that will fit between the legs and rest atop the four braces (figure U) .

Secure the shelf with finish nails. To make the shelf more useful, add a 1” by 2“ lip to two of the sides (figure V)

to prevent tools from vibrating off as you work. Leaving the ends open makes it easy to blow or brush off sawdust that falls onto the shelf. For a more useful work surface, add a top made of 3/4” plywood (figure W).

The width of the top will vary according to its use, but it’s best to make its length the same as that of the sawhorse so the top is supported at both ends. In this example, the plywood is cut to 9“ by 36”, leaving a small overhang on the sides.
Attach the top with screws, which hold better than nails and make it easy to replace the top if necessary.
Countersinking the screws so that their heads are below the wood’s surface will prevent them from scratching your submissive. To countersink the screws, first drill pilot holes for each screw. Then use a countersink,or a larger drill bit to cut an indentation in which the screw head will fit. (figure X)

Customize your sawhorse as needed–wrapping the top in carpeting or padded leather/material for use with delicate subbies, or adding attachments to hold frequently used tools.

Resource Article : MissBonnie © CollarNcuffs.com

How to make a rubber Cat-O-nine-Tails For Femdom play scenes

You can be like the cat that got the cream with this rubber Cat-O-Nine-Tails. The cat-o-nine tails is a type of multi-tailed whipping device that originated as an implement for severe physical punishment, notably in the British Royal Navy.

To make the rubber flogger you will need…

  • A piece of wooden doweling ? a section of broom handle is idea and inexpensive
  • a cycle inner tube
  • rubber cement and some elastic bands.

First cut a piece of doweling to 14cm in length. Sand the end to get rid of any rough edges.

Cut a length of inner tube to 53cms, avoiding writing on the rubber. Then cut a straight line length-ways down the tube and open it out to a rectangle.

Cover the first 15cm of the rubber, (on the inside) with rubber cement. Place the piece of dowel onto the glued up rubber and hold it firm whilst it starts to stick. Then slowly roll the dowel along, rolling it up in the rubber. The other side of the rubber rectangle should overlap onto the first side.

Leave a small amount of overhanging rubber off the end of the dowel. This can be cut to size later once the glue is dry.

Wipe away any excess glue with a damp cloth.

Hold the rubber in place on the dowel by fixing a couple of elastic bands around to hold everything securely in place whilst the glue dries.

After a good 20 minutes or so, remove the elastic bands.

Re-apply glue to any edges that have not suck down properly the first time, and again hold everything in place with elastic bands. Leave overnight until all the glue had dried. In the morning remove the elastic bands, clean any excess glue away, and trim the overhanging rubber on the handle of the flogger.

At the other end of the flogger where there is a long surplus of rubber, carefully cut the rubber length ways towards the handle to create tails. The rubber easily cuts with a sharp pair of scissors. Either cut chunky tails or skinny tails. If you do cut thinner tails you can add to the pain by tying a small knot at the tip of each tail, great for really naughty slaves.

Resource Article: S.Roberts © collarncuffs.com

Rope Web

Understanding Rope Web for Bondage: A Beginner’s Guide

What is a Rope Web for Bondage?

A rope web is an intricate network of ropes used in bondage practices to create visually stunning and secure patterns on a person’s body. It often serves both aesthetic and functional purposes in the realm of BDSM. The complexity of the design can range from simple to elaborate, providing a diverse experience for both the dominant and submissive participants.

Benefits of Using a Rope Web

Using a rope web for bondage offers multiple benefits. Firstly, it enhances the physical connection and trust between the partners. Secondly, the visual appeal of a well-constructed rope web adds to the overall sensual atmosphere. Additionally, the varied pressure points created by the rope can enhance sensory experiences, providing unique physical sensations.

How to Use a Rope Web for Bondage

To successfully use a rope web, start by choosing a sturdy and soft rope to avoid injury. Begin with basic knots and gradually progress to more elaborate patterns as you become more comfortable. Communication with your partner is crucial; always ensure that there is mutual consent and a safe word in place. Practice caution and never leave a person unattended while they are bound.

There are several tutorials and guides available online that can assist beginners in learning the art of creating rope webs/ Below is just one. Joining local workshops or online communities can also provide valuable insights and feedback.

Rope Flogger

or for a different version!

Creating a Rope Flogger for Femdom Impact Play: A Step-by-Step Guide

Introduction to Rope Floggers

For those interested in the world of femdom and impact play, creating your own rope flogger can be a rewarding experience. A rope flogger is a versatile, customizable tool that can deliver a variety of sensations, making it an excellent addition to your collection of BDSM implements. In this guide, we’ll walk you through the process of making a rope flogger step-by-step.

Materials Needed

Before you begin, you’ll need a few essential materials. These include:

  • Rope (cotton or synthetic, approximately 30-40 feet)
  • A handle (a piece of dowel rod or a repurposed handle from another tool)
  • Scissors
  • Tape
  • Glue (optional)

Ensure the rope you select is soft and flexible enough to prevent injury during play.

Step-by-Step Instructions

Step 1: Measure and cut the rope into equal lengths. The standard length is around 18-24 inches per strand, but this can be adjusted according to preference.

Step 2: Secure one end of the rope strands to the handle using tape. This forms the base from which the flogger will extend. If you’re using glue in addition to tape, let it dry completely before proceeding to the next step.

Step 3: Arrange the rope strands evenly around the handle. Once satisfied with the arrangement, use additional tape to secure the strands tightly in place.

Step 4: To ensure durability and added grip, wrap another layer of tape around the handle, covering the exposed ends of the rope strands.

Caring for Your Rope Flogger

Routine maintenance and care will extend the life of your rope flogger. Clean the flogger after each use by gently wiping down the rope strands and handle with a damp cloth. Store your flogger in a cool, dry place to prevent damage and wear.

With your new rope flogger, you can explore new dimensions of impact play within the context of femdom, enhancing both trust and intimacy in your relationship. Remember, safety and communication are paramount.

Rope Blindfold

Creating Unique Femdom Scenes with a Handcrafted Rope Blindfold

Introduction to Femdom and Sensory Deprivation

In the world of BDSM, sensory deprivation can significantly enhance the overall experience. One way to add a special touch to your femdom scenes is by integrating a handcrafted rope blindfold. This unique accessory not only looks aesthetically pleasing but also deepens the submissive’s sensory adventure.

Why Choose a Rope Blindfold?

A rope blindfold offers several benefits over traditional blindfolds. It allows for a customizable fit, ensuring that it is secure but comfortable. The texture of the rope can add an extra layer of sensation, taking the submissive’s experience to a new level. Moreover, because it’s handcrafted, you can personalize it to suit your specific dynamic.

Creating Your Own Rope Blindfold

Making your own rope blindfold is simpler than it might seem. First, you’ll need a soft but durable rope material, typically cotton or silk. Measure the circumference of the submissive’s head and add a few extra inches for tying. Weave or braid the rope for added texture and visual appeal. Finally, tie knots at the ends to secure it safely behind the head without causing discomfort.

Incorporating the Blindfold into Your Scene

Now that you have your handcrafted rope blindfold, it’s time to incorporate it into your femdom scene. Communication is key: Ensure that both parties are aware of boundaries and safe words. The blindfold can be used at various points during play to heighten anticipation and make the experience more immersive. Always monitor the submissive’s comfort level to ensure a safe and enjoyable session.

Conclusion

Handcrafted rope blindfolds are an excellent addition to any femdom scene. They offer a blend of aesthetic appeal, functionality, and personalization that traditional blindfolds simply can’t match. By taking the time to make one, you are not only enhancing your scenes but also investing in the unique bond you share with your partner.

Rope Bit Gag

Making a rope Bit Gag. I loved finding this instructional video on how to create a rope bit gag. I loved that I could create a rope set with the flogger, leashes and collar and blindfold etc. for play (Video Tutorial) we’ve got them all in the resources here!

Crafting a Rope Bit Gag for Femdom Play

Why Personalize Your Bondage Gear?

In the world of BDSM and femdom play, personalizing your equipment can add a unique and intimate touch to your sessions. A handcrafted bit gag is not only a functional piece of gear but also a symbol of care and attention to detail. Producing your own bondage items can enhance the overall experience by allowing you to customize both the aesthetic and the size to suit your needs.

Ensuring Safety and Comfort

Always consider safety and comfort when using homemade bondage equipment. Test the bit gag gently to ensure there are no sharp edges or uncomfortable pressures. Communication with your partner is crucial for a safe and pleasurable experience. Adjust as needed to ensure a secure yet comfortable fit.

By crafting your own bit gag, you imbue it with a personalized touch that can make your sessions more meaningful and enjoyable.

New Report

Close